WSL 2 and VPN - resolve(!) DNS issues
WSL networking stopped working when upgrading from WSL 1 to WSL 2? Connecting to any host not working? Still getting “Temporary failure in name resolution” all the time?
There are at least three known issues, all resulting from the combination of WSL 2 and a VPN. I will demonstrate with a Paloalto GlobalProtect solution, but other VPN clients have similar problems.
The issues are:
- VPN connections messing up the route from WSL 2 to the Windows host
- WSL 2 configured to auto-resolve nameservers when used with a VPN
- WSL 2 and VPN MTU mismatch leads to dropped connections
This post is all about the second issue. I previously covered the first one, check out the extensive coverage in VPN connections messing up the route from WSL 2 to the Windows host. You will need to fix 1) before you tackle 2). Fix 1) first and then come back here.
What’s up with DNS in WSL 2?
WSL 2 contained significant changes in the network stack implementation. With WSL 2, the networking is done through a virtualized Ethernet adapter with its own unique IP address. This way is flexible but exposes WSL 2 to changes on the Windows host adapters. The differences between WSL 1 and WSL 2 lead to failure in many VPN scenarios.
In WSL 2, there is a complete Linux kernel running in a VM. When you connect to a host, the Linux kernel is responsible for routing IP packets and resolving hostnames. Linux reads the configuration for hostname resolution from /etc/resolve.conf. The exact details can vary depending on the Linux distro you run in WSL 2, but it’s roughly the same in all of them. I’m using Ubuntu.
The network config originates in Windows, so WSL 2 must bridge that gap. By default WSL 2 reads nameservers from Windows when the Linux distro is started. It dumps this into ../run/resolvconf/resolv.conf and makes /etc/resolve.conf a symlink to it. There are a couple of issues with this. First, it defaults to the IP of the virtual WSL ethernet adapter as the nameserver. My WSL virtual adapter is assigned 176.20.176.1. Why that makes any sense as a default, I have no idea.

Second, and this is the big problem: the second a VPN is turned on, the config is out of sync. VPNs are implemented through virtualized Ethernet adapters that have their own nameserver configuration. It makes sense. VPN often gives access to internal sites, which should only resolve while on the VPN. No wonder it sets the nameservers. WSL 2 will not propagate the change of “active” nameservers to the running Linux kernel, however. The end result is the wrong nameservers configured for WSL 2 while the VPN is on.
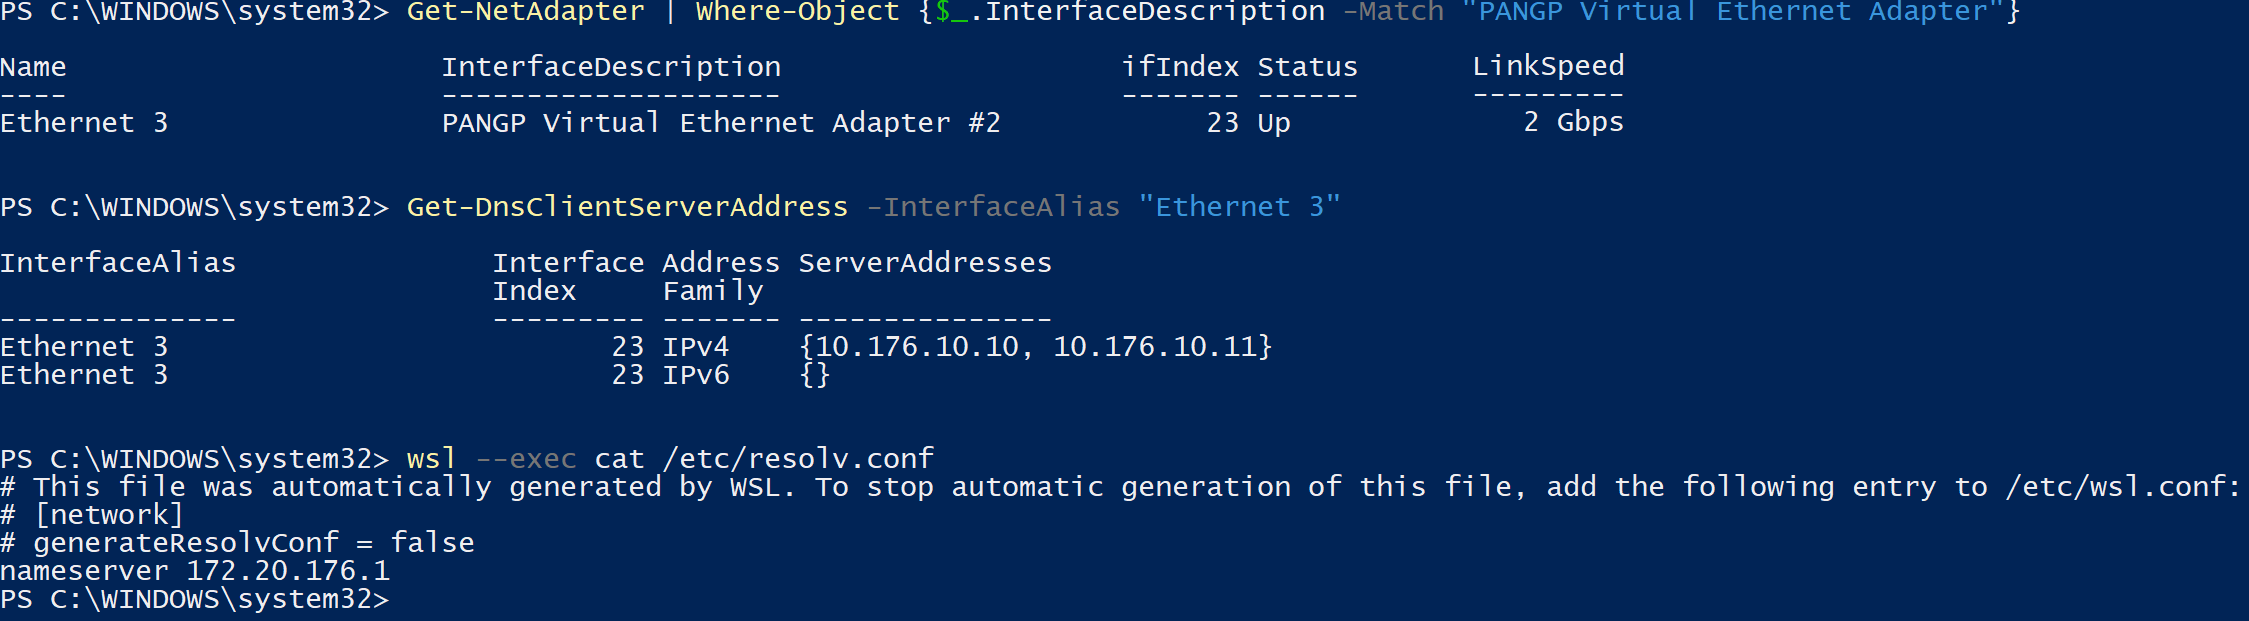
On my machine, you see that with my VPN up (ethernet adapter called “PANGP Virtual Ethernet Adapter”), the correct nameservers are 10.176.10.10 and 10.176.10.11. The Linux kernel in WSL 2 is still trying to resolve hostnames through 172.20.176.1. Not going to happen.
Alright, what’s the fix?
Simple! We tell WSL to be less smart and configure the nameservers ourselves.
First step: tell WSL 2 to be less smart. The whole put the host environment nameserver config into /etc/resolv.conf behavior is controlled by config in /etc/wsl.conf. Simply set the value of generateResolvConf under [network] to false in the file, and it stops.
Once autogeneration is off, we can update /etc/resolv.conf with the correct nameservers ourselves. Make sure to turn off the autogeneration before updating /etc/resolv.conf. If you don’t, WSL 2 will overwrite your custom /etc/resolv.conf later.
/etc/resolv.conf is a system file, so use root to remove the symlink and create a new file.
The new file should contain the nameservers of the VPN virtual adapter on your machine.
Like this:
nameserver 10.176.10.10
nameserver 10.176.10.11
One painful thing is that this config is probably only correct while the VPN is up. Once you disconnect, those nameservers are probably not reachable anymore. I use a mix of VPN nameservers and Google nameservers in /etc/resolv.conf to fix this. Like so:
nameserver 10.176.10.10
nameserver 8.8.8.8
nameserver 10.176.10.11
nameserver 8.8.4.4
The VPN nameserver in the first entry (10.176.10.10) resolves everything if the VPN is up. If VPN is down, the VPN nameserver times out and the second entry (Google nameserver 8.8.8.8) resolves it instead. This way, I don’t have to switch the config file every time I turn VPN on/off. There is a slight delay before the second server gets the request. If this annoys you, you can reorder the other entries the other way around. If you primarily work with the VPN on, have the VPN nameserver first. If you have the VPN mostly off, use Google (or any other non-VPN) nameserver first.
Awesome, how do I fix this on MY computer?
- Open WSL 2 and
sudo bash. -
Open /etc/wsl.config and set generateResolvConf to false. Use any editor, like nano:
nano /etc/wsl.confIt should look like this:
[network] generateResolvConf = false - Use
rm /etc/resolv.confto delete the old symlinked /etc/resolv.conf -
Find your VPN virtual adapters name. One way to do this is to open a Powershell terminal and run:
Get-NetAdapter. You need to find the VPN adapter here. It will vary based on your VPN provider. You can spot it by looking at the InterfaceDescription column. On Paloalto GlobalProtect it’s called PANGP Virtual Ethernet Adapter #2. Note down theNameof your VPN adapter interface. In my case, it is Ethernet 3.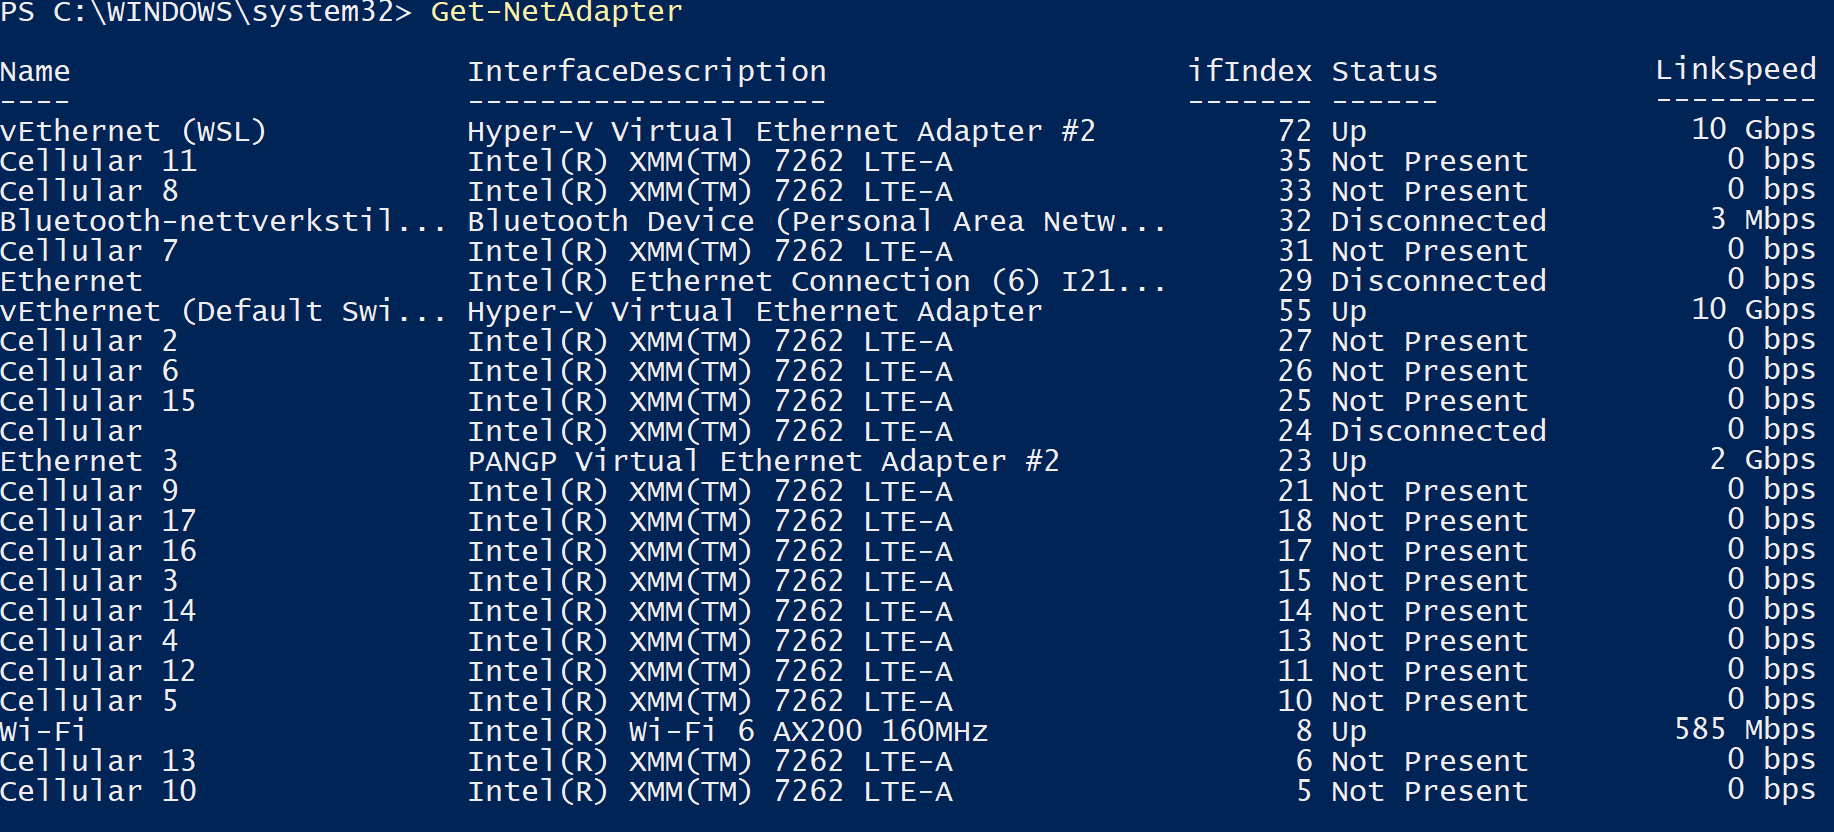
-
Find your VPN adapters nameservers. Run
Get-DnsClientServerAddresswith the correct name from the step above:Get-DnsClientServerAddress -InterfaceAlias "Ethernet 3". Note down the nameservers returned. In my case, 10.176.10.10 and 10.176.10.11.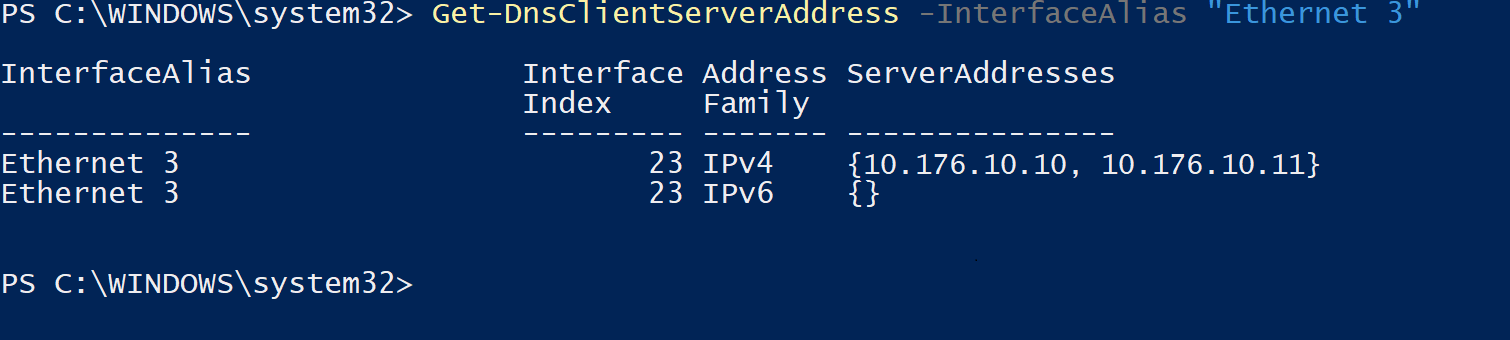
-
Open /etc/resolv.config with any editor, like nano:
nano /etc/resolv.conf. Add your VPN adapter nameservers to the config file. Make sure to remove any existing nameserver or add the VPN nameservers at the top. You should end up with something like this in /etc/resolv.conf:nameserver 10.176.10.10 nameserver 10.176.10.11 - Shut down WSL 2 by existing your disto and run
wsl --shutdown. - Start the distro again with
wsland you are good to go.
Recap
That’s about it. Fix the routing issue first and then this DNS config issue. You end up with fully working WSL 2, able to access the network while on a VPN connection. You might want to check out WSL 2 and VPN MTU mismatch if you still some connections failing occasionally.